Monday, May 19, 2014
Wednesday, January 15, 2014
The
Challenge: Make do and Mend

Pattern: None
Year:1860s
Notions: Cotton thread
How historically accurate is it? As much as can be managed.
Hours to complete: 2 (done at extremely leisurely pace!)
First
worn: About 5 years ago. Will be worn again soon!
Total
cost: $0 (fabric from stash)What better way to start the new year, but with repairing and healing something broken?! So, for this challenge I thought I would do a long put-off, but necessary repair. For this challenge, I choose to repair my busted cage crinoline.
But first, a little background!
What is a cage crinoline? Basically, it is a support garment made of wire wrapped in buckram and suspended on a system of tape ties attached to a waistband. Wikipedia says the following:
"The first hoop skirt in the US is
from 1846, patent number 4,584 of David Hough, Jr. In 1858, IRJ
Mann's US patent number 20,681 was the first latticework of strings
and hoops.
In 1858, the American W.S. Thomson greatly facilitated the development of the cage crinoline by developing an eyelet fastener to connect the steel crinoline hoops with the vertical tapes descending from a band around the wearer's waist. The invention was patented in the United States (patent US21581), France (patent FR41193) and Britain (patent GB1204/1859). This facilitated the fashionable silhouette's development from a cone shape to a dome...
The cage crinoline was adopted with
enthusiasm: the numerous petticoats, even the stiffened or hooped
ones, were heavy, bulky and generally uncomfortable. It was light —
it only required one or two petticoats worn over the top to prevent
the steel bands appearing as ridges in the skirt — and freed the
wearer's legs from tangling petticoats.”
http://en.wikipedia.org/wiki/CrinolineAfter a few years of happy use, my trusty hoop skirt started popping rivets! A good rivet on the front of a crinoline should look like this:


So, I started by measuring the length of the break. I then cut a piece of coutil (a heavy cotton cloth with a tight herringbone weave frequently used in corset construction due to it's sturdiness and durability.) about 2.5” deep x the length of the break/repair plus .5” seam allowance on either side to create the “patch”.
The next step was to use heavy starch and an iron to press the bottom and two sides of the fabric leaving the top end open.

I then wrapped the patch around the break in the hoop starting with the exposed edge and ending with the finished/folded edge on the bottom of the hoop.
.jpg)
Then, using a simple buttonhole (or a whip stitch would work too!) I encased the break! All there was to do after that was to repeat 6 more times!

A little bulky, but done and finally period correct again!

Stay
tuned in a few weeks for the next challenge: INNOVATION!
Here's
a sneak peek.
Next
Week Hopefully This:

Will
turn into one of these!

Saturday, January 4, 2014
Welcome 2014!
With the new year comes new challenges and goals.
This year, I hope to do more sewing projects for myself. It is my dream that this will help me to continue to grow as an historian and as a seamstress!
In an attempt to fulfill this wish I have joined the wonderful community of "The Historical Sew Fortnightly" and will be following along as many of their challenges as possible! If you'd like to follow along yourself it can be done here:
 Look for new posts in the coming weeks!
First up: Make Do & Mend
Make Do and Mend Challenge
This year, I hope to do more sewing projects for myself. It is my dream that this will help me to continue to grow as an historian and as a seamstress!
In an attempt to fulfill this wish I have joined the wonderful community of "The Historical Sew Fortnightly" and will be following along as many of their challenges as possible! If you'd like to follow along yourself it can be done here:
First up: Make Do & Mend
Make Do and Mend Challenge
Monday, January 16, 2012
Blue and white checked Family Heirloom weavers dress from Spring 2011. (Sorry for the picture quailty!)
| The dress: | Blue and white checked fabric with a hint of pale yellow. Fabric woven by Pat Kline of Family Heirloom Weavers. Bodice and skirt over 4 tier hoop.  This is a shot of the matching yellow hem facing to help protect the bottom of the skirt. It is made of yellow polished cotton.  Bodice front is lined and boned for added stability.  |
Sunday, January 15, 2012
Well, I've been crafting, baking, and dancing. But failing at blogging. While I'm slacking at posting, you can follow me on my BRAND NEW pinterest site! (whoot!) Find me on Pinterest here. :)
Monday, December 5, 2011
"sew" behind on posts!
Lol, so all the sewing has been going really well... However, the blogging part is failing! My plan is to post some pics of recent projects and let you guys ask about what ya want! Hopefully, I'll get that up soon. (Fingers crossed!)
Friday, October 14, 2011
Past Patterns 031 War of 1812 Everyday Gown
Hello lovely readers!
Here is the blog long promised regarding Past Patterns 031!
Pattern Accessibility: Perfect for Advanced Sewers
Regarding the pattern: I followed the instructions for the bodice as described. However, when it came to constructing the skirt I ran into a few issues and had to rework it.
Before Making this Dress: Make sure you know what underpinnings you intend to wear with this gown and have them made. The Federalist/Regency era has some of the most comfortable garments to wear (both inner and outerwear). If you pass the pencil test you could possibly go without stays, though wearing properly fitted undergarments will make your lovely new dress more comfortable and get the correct period look. For stays, I used Simplicity pattern 4052 with great luck. I would suggest if you have narrow shoulders to half the width of the shoulder straps for more comfort! :) The woman who made this pattern also has amazing online tutorials to help you put it together. So good!

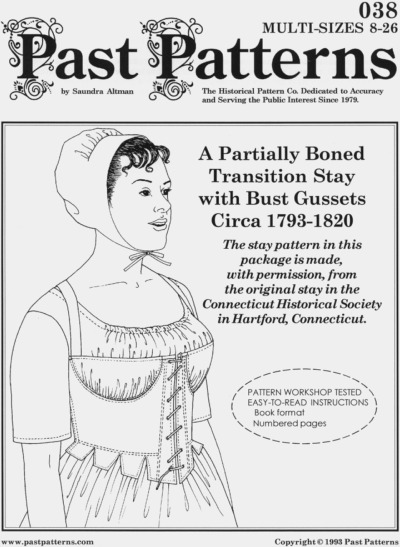
If you are a woman who needs a lot of support and likes slight waist compression I would recommend Past Patterns 038. I have not personally tried this pattern, but I like the look! This for a person who's ready for a bit more challenge from her pattern in addition to the extra support. This one is a bit more like an historical bustier. :)
Construction:
Before starting any new pattern I like to make a toile (a mock-up/trial garment). As I am so very tiny in the bust and ribcage, nearly every pattern needs to be altered. (sigh) So, I made my mock up as usual. This also gave me a chance to practice the very awkward way the bodice is pieced and figure out what HAD to be sewn by hand and what COULD be sewn by machine. (Of course, it can ALL be done by hand!!!)
Upon completion of the toile, I was DELIGHTED to discover that due to the drawstring, the dress fit without any alterations to the pattern!! Whoot whoot! Now, I could cut into the linen without fear!
 |
| Toile made of muslin and marked for right and wrong sides! |
Sleeves... Just as a heads up; I think they're EVIL! If I never had to fit a sleeve into an armsythe, I'd be a happy happy girl! LOL. However, a world of vests would be mighty cold come winter so, it's a battle we must all face. Expect to put them in incorrectly a few times. Don't get discouraged! You'll get it! Ms. Altman does a great job of notching the pattern to help get everything in correctly. Trust her, it will help. I found the sleeves a bit baggy (wide), but I think that's useful in a work dress so that you will have full mobility. I imagine you would lose some of that if the sleeve was more fitted. Also, keep in mind that dress sleeves of this period have the fullness at the TOP BACK of the sleeve. This feels super weird to the modern wearer, but makes sense for mobility. (Think of it as a cute cap-sleeve that's on the back of your shoulder rather than the top.) I found with this pattern that there was very little to "ease" into the scythe. As a matter of fact, I didn't bother to run gathering stitches at all as it fit into the arm scythe without to much fuss. Hooray!!! And, I'll be honest, I actually was able to set this sleeve correctly on the first try! So, there's hope!
 |
| Finished bodice before attaching skirt. The bottom drawstring also is not yet in place. |
Once the bodice was constructed I began working with the pattern for the skirt of the dress. After reading and experimenting with the instructions and historical information I decided to not use all of the pattern. My first problem was that if I followed the pattern in three pieces my vertical stripes would have ended up horizontal! Lol, that just wasn't going to work for me and my vertical striped bodice! So, I did the math and cut my fabric to the recommended width and a height longer than I wanted the end result (so I could add the tucks later). By changing the layout of the fabric, I also was able to make a front seam down the front of the dress salvage to salvage, thus preventing me from having to put a slit down the front. (I just pressed the seam back, whipped it into place and continued following that section of the pattern.) I also had to adjust the pleating guide to reflect this change. Then did used the pleating guide to set a the back five pleats. I also marked the stopping point for the pleats. The next step was to pleat the skirt evenly right and left until the stopping marks are reached. The pattern calls for uneven pleats on the right and left side and the kinda bothered me. I found historical precedence for even pleats in Janet Arnold's book "Patterns of Fashion." So, I went for the more even pleats as I felt it would create a more even visual line.
Remember, you certainly can follow the pattern as given! There are other ladies online who have done this with success and you can too!
 |
| Pleating the skirt. |
When it came to attach the skirt to the bodice, I also changed it up a smidge. First, I attached it as the pattern suggested. After I did that, I realized that I didn't like the way the skirt was left unfinished inside the dress. So, I pulled up just a few stitches of the back panel of the lining and laid the skirt in right side to right side then folded and press the lining. Finally, the lining was whipped it over the skirt.
 |
| Back of dress with skirt attached! |
All that was left to do was sew up the front seam and hem the dress! (whoo hoo!!) And that is what I did! (yay!)

Ok, so... not quite the last thing to do. There is also the addition of a crescent shaped tuck that prevents the dress from pulling backwards in the front and making the dress easy to trip over! (ahh!!) The hem on this particular dress is also a little deep so that later on, I can remove it and put in a few decorative tucks!!! But for now, I think the dress is in pretty good shape!

Feel free to contact me with any questions. :)
Best wishes, good luck, & happy sewing!!!
Subscribe to:
Posts (Atom)